Thought to share the way how you need to configure the Group Policy to push SCCM 2012 Agent to the client machine in your environment. Basically there are about couple of ways of deploy SCCM Agent. If we list down those
1- Push Agent using SCCM 2012 SP1 console
2- Push Agent using Group Policy
3- Push Agent Using Script
4- Manual Agent installation
But when we consider some customer environments some of them are very strict on their firewall rules like blocking “File AND Print Sharing” so on so forth. But to push agent via SCCM console we need to allow the “File and Print Sharing”. In that case we need to enable the File and Print Sharing in client pc windows firewall as well. In some cases even from virus guard also blocking File and Print Sharing. So what is the method to do this?
That’s where Group Policy comes in to the picture. So following shows you the exact steps of enabling the GPO settings to push SCCM 2012 SP1 agent in to client machine.
Let start of enabling the GPO now.
1- Go to your Domain Controller and Open the “Group Policy Management” console.
2- “Right Click” on the Group Policy Object and Click “New” to create the GPO as follows.
 |
3- Under the New GPO console just put a name to it and Click “OK”

4- As a next step “Right Click” on the created GPO and Click “Edit” tab to configure the GPO.

5- Once you select the “Edit” option then select the “Add/Remove Templates” option to add the .adm templates which you can find it in SCCM 2012 Setup folder.
You can locate the templates in the below location.
{CD ROM:\SCCMSETUPFOLDER\SMSSETUP\TOOLS\ConfigMgrADMTemplates}

6- “Click Add” tab to import the Templates.

7- Select the both templates from the location which I mentioned above and select “Open” to import the files.
Note- I recommend you to first copy the templates in to windir%\inf of the Domain controller and import it from there.

8- Once it imported close the “Add/Remove Template” option.
 |
9- Once the GPO is created you will need to do the following to configure the GPO:
(I). Open the “ConfigMgrAssignment” item and choose enable then enter your site code.
- Note: this will help keep clients assigned to the correct site in your infrastructure.


(II). Then Open the “ConfigMgrDeployment” and “Enable “it.
i. Enter the command line parameters that you want to do.
Note: Only do step (II) if you have not extended your AD schema and published your site to AD. If you have already done this then the install command line is already published to AD. Therefor you don’t need to enable this option.
For more information of publishing to AD read this
10- After configured the policies then you need to configure the SCCM 2012 SP1 Agent installation Software Package. To configure the software Package do the following steps.
11- Right Click on the Software installation and select “New” and select “Package”.

12- Then Enter the UNC path to the CCMSetup.MSI.
(It’s better if you can keep the .msi file in a file server for safe side or you can keep it in the SCCM Server as well)
i. Example: \\fileServer.domain\SCCM_Client\CCMSetup.MSI

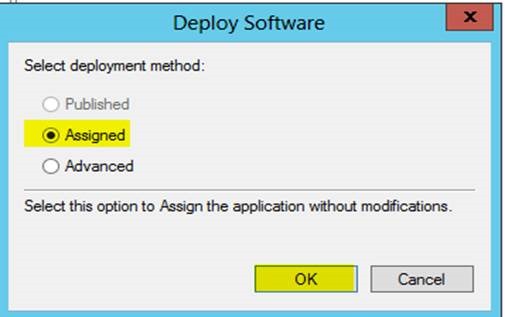
13- Once you given the file path then select “Assigned” option and click “Ok” to confirm it. Then you will see the Configuration completed as follows.


14- After the software package configuration completed then “Link the created GPO” to a particular OU as indicating below and let the SCCM agent to install via GPO.
 |
Thanks All. 
No comments:
Post a Comment