We have been using different Methods / Scripts to install SMS/SCCM Client from Previous version of Configuration Manager.
 If you have custom command properties to be used for the client installation like port used,cache size,FSP,provide them on installation properties.
 As soon you click on Push,Site server will create CCRs for each computer ,which you can see from CCR.box inbox folder.
In SCCM 2012,We do have the same methods what is available in SCCM 2007 , But with the release of Configuration Manager 2012, New tool has been introduced which is ClientpushGenerator.exe. More info will follow. http://technet.microsoft.com/en-us/library/gg682191.aspx
This tool can be found from SCCM Installation Drive folder:\AdminConsole\bin\ClientpushGenerator.exe.
This procedure requires you to enable Client push installation the site where the clients assigned to.
How to enable Client push installation :
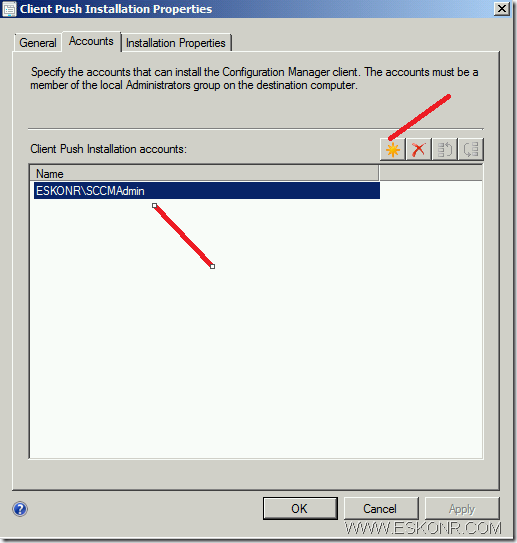
From the administration Pane–Site Hierarchy—>Sites–>Right click on site ,you see client installation Settings—>Client Push Installation
Move onto Accounts Tab and create New Account.
 If you have custom command properties to be used for the client installation like port used,cache size,FSP,provide them on installation properties.
For Ex: smssitecode=P01 smscachesize=10000 ccmhttpport=8080 FSP=CM12FSP01
How to provide local admin rights on target computers for the account specified here ?
You may follow the procedure http://eskonr.com/2010/09/make-account-member-of-local-adminswhich-may-be-useful-in-configuration-manager-for-installation-of-sccm-client-push/
We are now done with requirements before we use Tool.
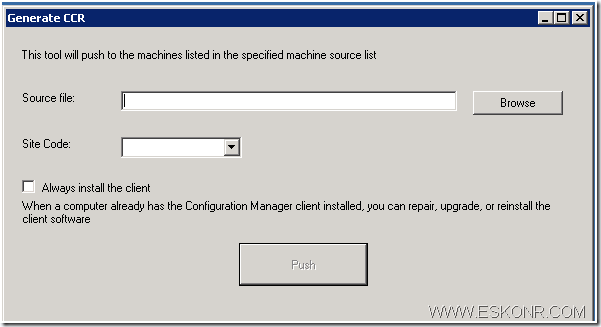
Run the Tool from the Above said Path
As you can see from the tool Above ,It asks for list of computers in text file and SiteCode to assign the clients to.(SiteCode will be pulled Automatically from the Hierarchy)
This tool helps you to install SCCM Client based group wise , how you defined the Boundaries.
If you boundaries are defined based on AD subnet/IP Address Range ,Get list of Computers from the specified Subnet/IP Address range and save them to Notepad.
Create a notepad ,pipe the computers into it and save it.
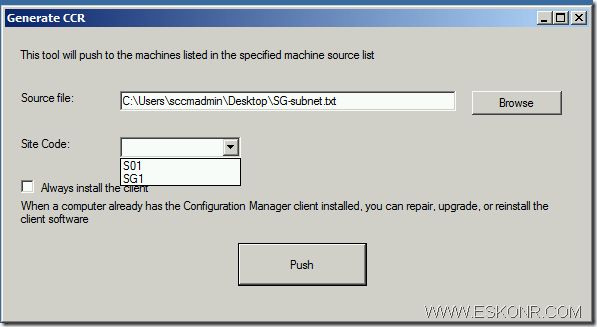
From the Tool, Click on Browse and select the notepad File what you created above and select the SiteCode,Click on Push
If you trying this on Already existing clients( could be CM07 as well),select always install the client.
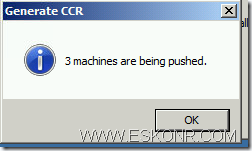
 As soon you click on Push,Site server will create CCRs for each computer ,which you can see from CCR.box inbox folder.
some Important Information to know About Client push Installation :
1.When you click on Push button, SCCM generates a client configuration request (CCR) file. The CCR file contains the client computer name and additional information.2.SCCM Client Configuration Manager connects to the ADMIN$ share on the client using the credentials what you supplied in client push installation Account. This is based on the information in the CCR file.3. The Client Configuration Manager connects to the client registry and gathers information about the client. This process is displayed as a log entry in the Ccm.log as connecting to IPC$.4. The SCCMcore component files, MobileClient.tcf and Ccmsetup.exe, are located in the SMS\bin\I386\ folder. These files are downloaded to the %windir%\ccmsetup folder on the client computer.5. The Client Configuration Manager verifies that the Ccmsetup service started successfully before disconnecting. The CCR file is added to the SCCM\Inboxes\Ccrretry.box folder for verification that the installation succeeded. On a second verification pass, SCCM determines that the SMS Agent Host is running, and then deletes the CCR file.6. If the Client Configuration Manager encounters any errors during this process, the CCR file is renamed to the request ID of the target client computer and is put in the SCCM\Inboxes\Ccrretry.box folder. The Client Configuration Manager checks for files in this inbox folder every 60 minutes and tries to reprocess them 168 times (7 days) before they are discarded. This information is logged in the Ccm.log. More info http://support.microsoft.com/kb/925282
In my case,it is only 3 computers and process will be quick.
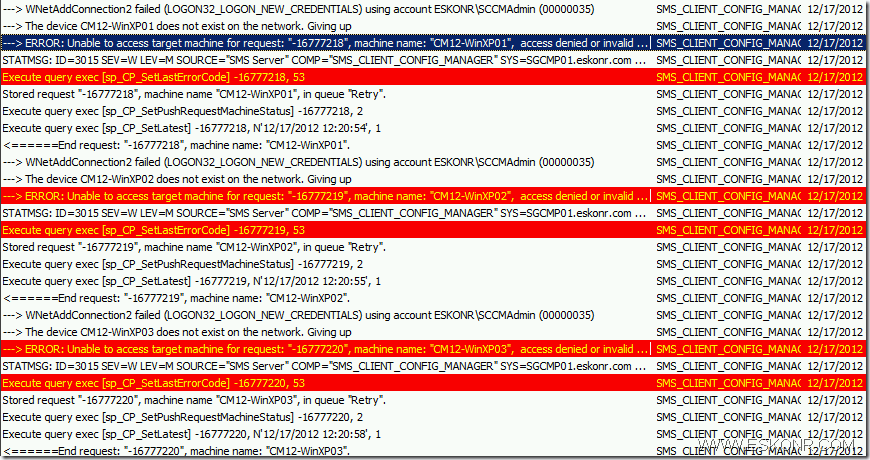
to check what is going, look at ccm.log how the installation is going on :
As you can from above screen shot, All the 3 machines that i tried to installed failed with error messages “Access Denied or Invalid path” and these CCR request are moved to CCRRETRY.Box with file name as Request ID as you can from below :
For the Computers which are online and connect to admin$,Client will be installed successfully.
List of errors code what is commonly occur during the client installation :
2 – The system cannot find the file specified.
5 – Access denied.
52 – You were not connected because a duplicate name exists on the network. Make sure there is not a duplicate name in DNS and that 2 machines don’t have the same IP in DNS.
53 – Unable to locate – http://support.microsoft.com/kb/920852 – cannot connect to admin$ – Computer Browser not started – add File/print sharing to Exceptions in Firewall – turn file and print on.
58 – The specified server cannot perform The requested operation
64 – The specified network name is no longer available. Source: Windows
67 – network name cannot be found.
86 – network password is not correct? Machine Name <> resolved name.
112 – Not enough disk space
120– Mobile client on the target machine has the same version, and ‘forced’ flag is not turned on. Not processing this CCR ,target machine already have cm client and no force install selected(always install).
1003 – Cannot complete this function.
1053 – The service did not respond to the start or control request in a timely fashion.
1068 – The dependency service or group failed to start
1130 – Not enough server storage is available to process this command. Source: Windows
1203 – The network path was either typed incorrectly, does not exist, or the network provider is not currently available. Please try retyping the path or contact your network administrator.
1208 – An extended error has occurred. Source: Windows
1305 – The revision level is unknown.
1396 – Logon Failure: The target account name is incorrect. (NBTSTAT -a reverse lookup, duplicate IP address)
1450 – Insufficient system resources exist to complete the requested service. Source: Windows
1789 – The trust relationship between this workstation and the primary domain failed.
2147749889 – Generic WMI failure (Broken WMI)
2147749890 – not found – Source: Windows Management (WMI) – try repair WMI
2147749904 – Invalid class – Source: Windows Management (WMI)
2147749908 – Initialization failure – Source: Windows Management (WMI)
2147942405 – Access is Denied (Firewall rule? / MacAfee-HIPS?)
2147944122 – The RPC server is unavailable. (Dcom is miss-configured for security . http://support.microsoft.com/kb/899965 )
2148007941 – Server Execution Failed
if you get other errors not listed above,you can either use net helpmsg errorvalue from the command promot or use cmtrace error look value (ref http://blog.configmgrftw.com/?p=42 and http://support.microsoft.com/kb/944375)
You can also try reporting to see how many computers having issues with the client installation.
SQL Query:
SELECT
Name,PushSiteCode,AssignedSiteCode,InitialRequestDate
LatestProcessingAttempt,
LastErrorCode,NumProcessAttempts
From v_CP_Machine
where LastErrorCode<>0
Order By LastErrorCode
Name,PushSiteCode,AssignedSiteCode,InitialRequestDate
LatestProcessingAttempt,
LastErrorCode,NumProcessAttempts
From v_CP_Machine
where LastErrorCode<>0
Order By LastErrorCode
References:
Prerequisites for Client Deployment in Configuration Manager http://technet.microsoft.com/en-us/library/gg682042.aspx
Determine the Client Installation Method to Use for Windows Computers in Configuration Manager:http://technet.microsoft.com/en-us/library/gg682191.aspx
How to Install Clients on Windows Computers in Configuration Manager –> http://technet.microsoft.com/en-us/library/gg712298.aspx
Until Then !
Related Posts:
- How to troubleshoot Advanced Client Push Installation issues in Systems SMS 2003 and SCCM 2007
- SCCM Configmgr 2012 SP1 Client for Mac,Unix and Linux OS
- make account member of local admins(which may be useful in configuration manager for installation of SCCM client Push)
- SCCM 2012 Client center alpha is available
- #SCCM / #Configmgr 2012 Package Conversion Manager (PCM) Tool easy way
- Hidden Files to control SCCM Configmgr 2012


No comments:
Post a Comment