Implement Out of Management Feature in SCCM 2012
The out of band management feature in Configuration Manager 2012 R2 only supports the following versions of AMT;
- Intel AMT version 3.2 with a minimum revision of 3.2.1
- Intel AMT version 4.0, version 4.1, and version 4.2
- Intel AMT version 5.0 and version 5.2 with a minimum revision of 5.2.10
- Intel AMT version 6.0 and version 6.1
More information about this here; http://technet.microsoft.com/en-us/library/gg682077.aspx#BKMK_SupConfigOOB
The issue here is that all new computers comes with newer versions of AMT, and cannot be provisioned for out of band management by Configuration Manager 2012 R2.
So after some research I found that Intel SCS 9.0 can be integrated with Configuration Manager 2012 R2 for provisioning and then all management can be done from Configuration Manager 2012 R2. All features like Web Interface, KVM, Serial Over LAN (SOL), IDE Redirection (IDER), Power Commands and Integration with Wake-On-Lan are fully functional.
We’ve successfully implemented this and I thought I would share the experience throug this series of blog posts.
Why do we need the Add-on for Intel AMT?
Configuration Manager 2012 R2 includes built-in support for Out of Band (OOB) management of Intel AMT. This includes the capability to discover and configure Intel AMT, and then use some of the OOB features of Intel AMT. Some of these capabilities were implemented by Microsoft using the Simple Object Access Protocol (SOAP) interface of Intel AMT. The SOAP interface has been deprecated for some time, and was replaced with the Web Services Management (WS-Management) interface. From version 9.0 of Intel AMT, SOAP is no longer supported and any solutions that use that interface will not work.
The Add-on enables SCCM to be used with all supported versions of Intel AMT.
After installing the Add-on Intel AMT component, these built-in capabilities of SCCM are replaced by Intel SCS:
- Discovery of data from systems that support Intel AMT
- Configuration/Unconfiguration of Intel AMT on the discovered systems
- Maintenance of Intel AMT settings on the discovered systems
All operations related to any of these tasks will be handled by Intel SCS components using a Kerberos Administrator user, configured in Intel AMT. This means that all built-in menu options and settings windows in SCCM related to “provisioning” or configuration are no longer used.
In this release of the Add-on, only the built-in SCCM features that use Kerberos authentication are supported. All these features are located in the “Out of Band Management Console”, available when you right-click a configured Intel AMT system.
You can download the Intel Software used in this series of postings from the following locations;
Intel Setup and Configuration Software (Intel SCS) – https://downloadcenter.intel.com/Detail_Desc.aspx?agr=Y&DwnldID=20921&ProdId=3051&lang=eng
Intel SCS Add-on for Microsoft System Center Configuration Manager – https://downloadcenter.intel.com/Detail_Desc.aspx?DwnldID=24010
Intel Core vPro processor add-on for System Center Configuration Manager –https://downloadcenter.intel.com/Detail_Desc.aspx?agr=Y&DwnldID=21835
Intel SCS Add-on for Microsoft System Center Configuration Manager – https://downloadcenter.intel.com/Detail_Desc.aspx?DwnldID=24010
Intel Core vPro processor add-on for System Center Configuration Manager –https://downloadcenter.intel.com/Detail_Desc.aspx?agr=Y&DwnldID=21835
This is Part 2 in a series of blog posts about Integrating Configuration Manager 2012 R2 with Intel SCS 9.0, this part will focus on the Active Directory configuration.
Intel AMT supports the Kerberos authentication method. This means that Intel SCS and Configuration Manager 2012 R2 can authenticate with the Intel AMT device using “Kerberos” users. These users are defined in the Intel AMT device using the Access Control List.
Integration of Intel AMT with your AD is mandatory when using the Add-on to configure Intel AMT. When integration is enabled, during configuration Intel SCS creates an AD object for the Intel AMT device. Some of the entries in this object define parameters used in Kerberos tickets.
Before you can integrate Intel AMT with your AD, you must:
- Create an Organizational Unit (OU) in AD to store objects containing information about the Intel AMT devices. In a multiple domain environment, Intel recommends that you create an OU for each domain.
I’ve created an OU named : AMT Provisioned Computers - Create an universal security group that will contain accounts for the provisioned AMT-based computers. (This is needed when configuring the Out of Band Management Components)
I’ve named the group : SCCM 2012 R2 AMT Provisioned Computers - Create an user account for AMT Provisioning,
I’ve named my user account CM_AMT - Create an User Group in your AD that will contain user accounts that need access to Intel AMT.
I’ve named the group SCCM 2012 R2 AMT AdministratorsAdd the following accounts to this Group:- The user account created for AMT Provisioning in previous step (CM_AMT)
- User accounts running the Configurator Manager Console (so that they can use the OOB Management Console).
- The computer account of the computer running the Configuration Manager. This will enable SCCM to run OOB Management Controller Discovery with these credentials.
- Give Create/Delete permissions in the OU you created in Step 1 to the user account running the Intel SCS component doing the configuration. (User account is created in Step 3)
Part 3
A CA is necessary if you want to configure any of these settings in an Intel AMT device:
- Remote Access
- Transport Layer Security
- 802.1x Setups
- End-Point Access Control
During configuration of these settings, Intel SCS sends a request to a CA software application to generate a certificate. Intel SCS puts the generated certificate in the Intel AMT device.
Intel SCS supports the Standalone and Enterprise versions of Microsoft CA. The Microsoft CA can have a hierarchy of CAs, with subordinate CAs and a root CA. In my lab environment I only have a root CA so this guide will show the setup of this. At the customer where I implemented this I was using a subordinate CA so it’s also fully possible to use a subordinate CA if your configuration requires that.
These features require a Standalone root CA or an Enterprise root CA:
- Transport Layer Security (including mutual authentication)
- Remote Access with password-based authentication
These features require an Enterprise root CA:
- Remote Access with certificate-based authentication
- 802.1x setups (Wired or WiFi)
- EAC settings
I will here go through the steps for configuring your Enterprise Root CA and Templates required for the integration between Configuration Manager 2012 R2 and Intel SCS 9.0. I’m running my Enterprise Root CA on Windows Server 2012 R2, so some of the settings might be found on different places in earlier versions on Windows Server. If you need guidance on installing your CA this can be found on TechNet for Windows Server 2008 and Windows Server 2012.
Required Permissions on the CA
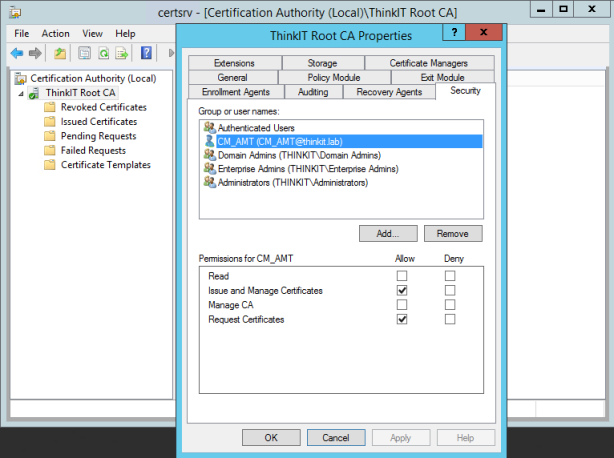
- Configure the required permissions on the CA, these permissions are required on the CA by the user account running Intel SCS component doing the configuration; (This is the CM_AMT account created in Part 2 of this series)
- Issue and Manage Certificates
- Request Certificates
Request Handling
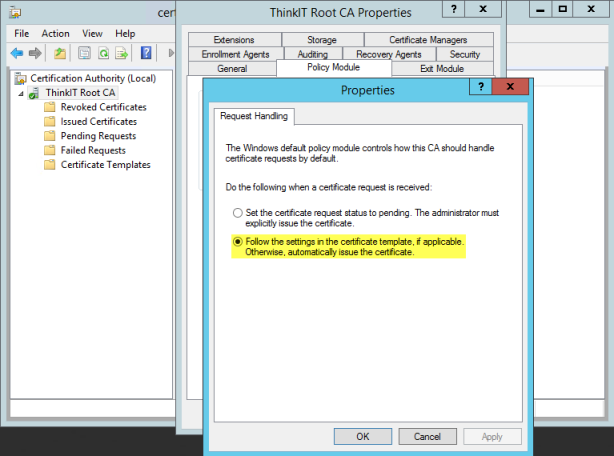
- Certification Authorities include settings that define how certificate requests are handled. Intel SCS does not support pending certificate requests. If during configuration the CA puts the certificate into the “Pending Requests” state, Intel SCS returns an error (#35). Thus, you must make sure that the CA and the templates used by Intel SCS are not defined to put certificate requests into a pending state. For Enterprise and Standalone CAs, request handling is defined in the Request Handling tab (right-click the CA and selectProperties > Policy Module > Properties). Make sure that the correct option is selected (shown in yellow in the screenshot below).
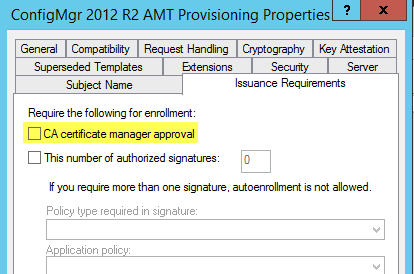
For Enterprise CAs, you must also make sure that the templates used by Intel SCS are not defined to require approval. Make sure that the CA certificate manager approval check box is NOT selected (shown in yellow i the screenshot below).
First we create a Template for Intel AMT features to use certificate-based authentication
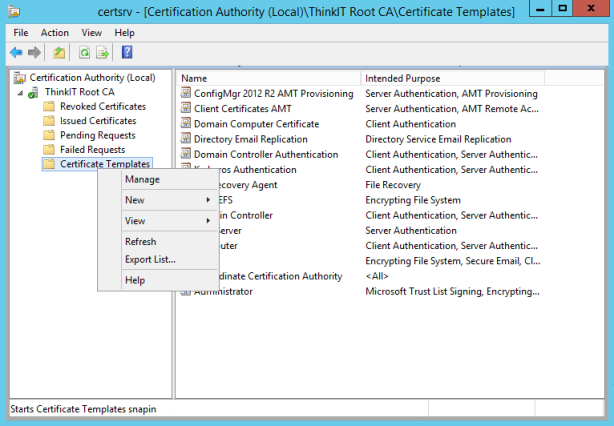
- On the server that has Certificate Services installed, in the Certification Authority console, right-click Certificate Templates, and then click Manage to load the Certificate Templates console.
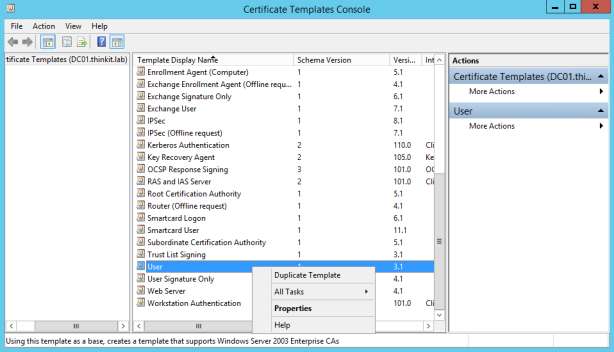
- In the results pane, right-click the entry that displays User in the Template Display Name column, and then click Duplicate Template.
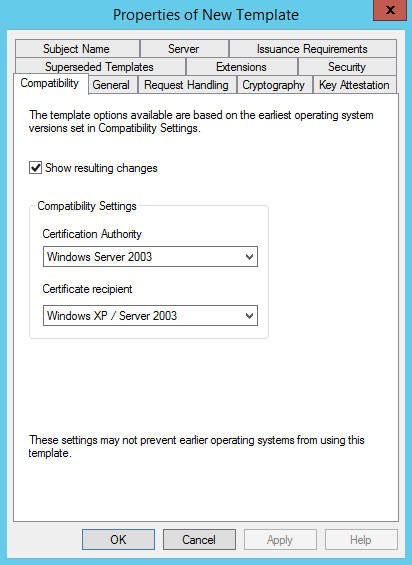
- In the Properties of New Template dialog box, on the Compatibility tab, ensure that Windows Server 2003 is selected for Certification Authority and Windows XP/Server 2003 is selected for Certificate recipient.
- In the Properties of New Template dialog box, on the General tab, enter a template name for the AMT provisioning certificate template. I’ve used AMT Client Configuration Certificate in my example.
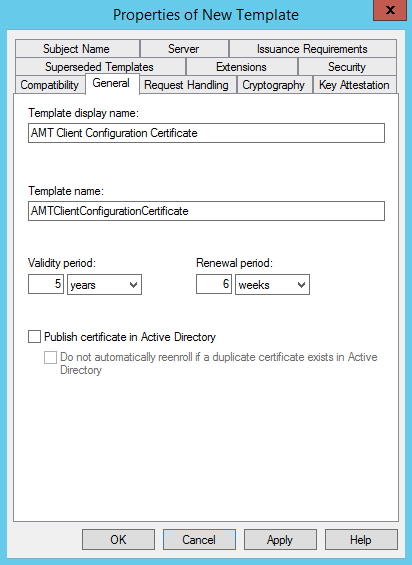
- Make sure that the Publish certificate in Active Directory check box is NOT selected.
- Change the validity and renewal periods as required by your policy. I’ve selected 5 years validity period and 6 weeks renewal period.
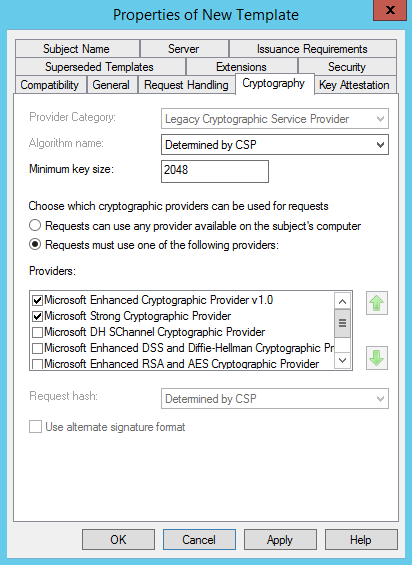
- In the Properties of New Template dialog box, on the Cryptography tab, in the list of providers, mark the check box beside Microsoft Strong Cryptographic Provider.
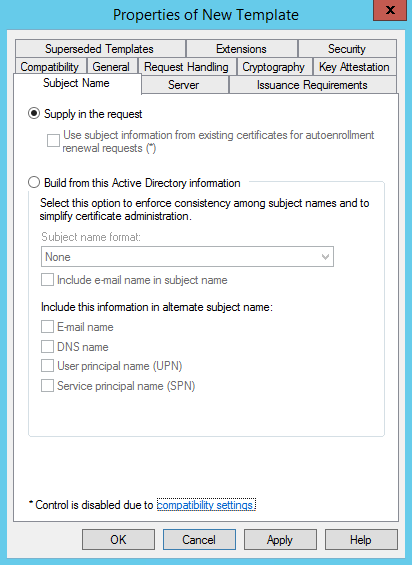
- In the Properties of New Template dialog box, on the Subject Name tab, select Supply in the request. (If you get a waring dialog box, click OK on it)
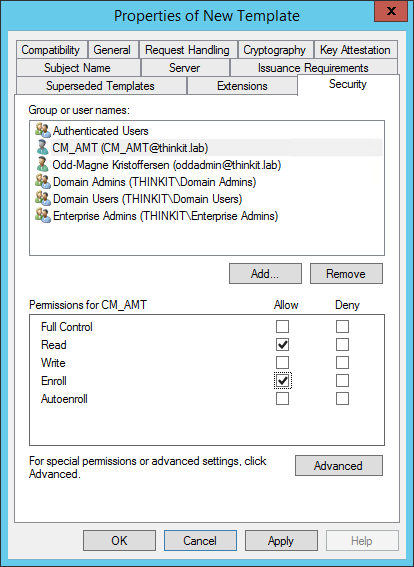
- In the Properties of New Template dialog box, on the Security tab, add the user running the Configurator with Read and Enroll permissions. (This is the CM_AMT user we created in Part 2 of this series)
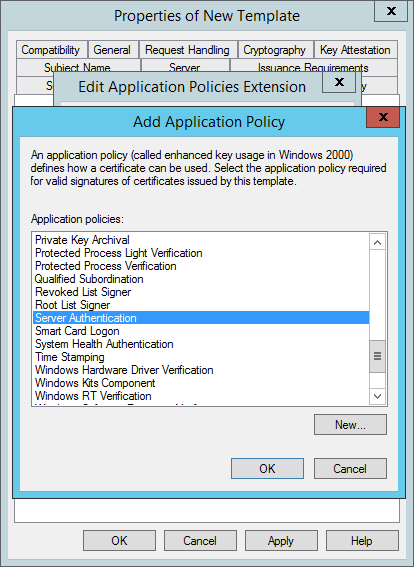
- In the Properties of New Template dialog box, on the Extensions tab, from the list of extensions, selectApplication Policies and click Edit. The Edit Application Policies Extension window opens.
- Click Add. The Add Application Policy window opens.
- From the list of Application policies, select Server Authentication and click OK.
- Back in the Edit Application Policies Extension window, click Add again. The Add Application Policy window opens.
- In the Add Application Policy window click New.
- In the New Application Policy window, type AMT Local Access in the Name field, and then type the following number for the Object identifier: 2.16.840.1.113741.1.2.2. Click OK.
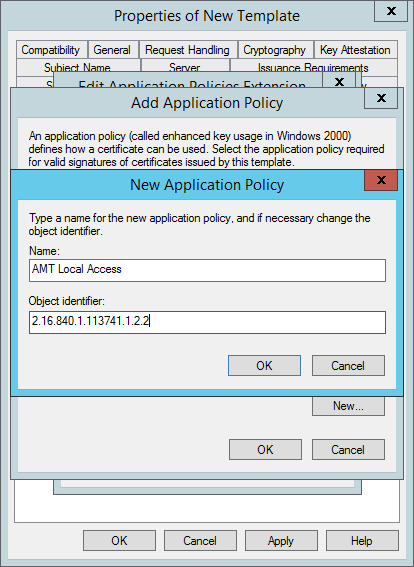
- Back in the Add Application Policy window click New.
- In the New Application Policy window, type AMT Remote Access in the Name field, and then type the following number for the Object identifier: 2.16.840.1.113741.1.2.1. Click OK.
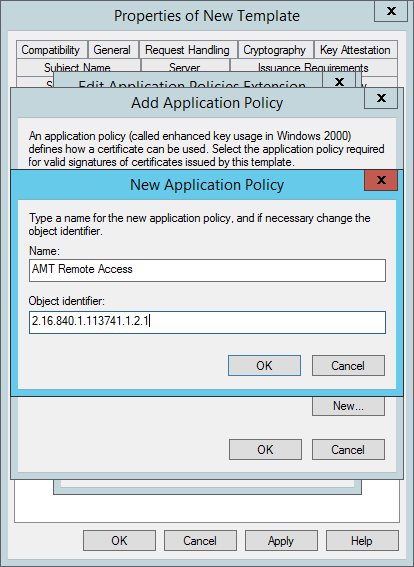
- Back in the Add Application Policy window hold CTRL in and select both AMT Local Access and AMT Remote Access and then click OK.
- You should then be back in the Edit Application Policies Extension window, and it should look like this;
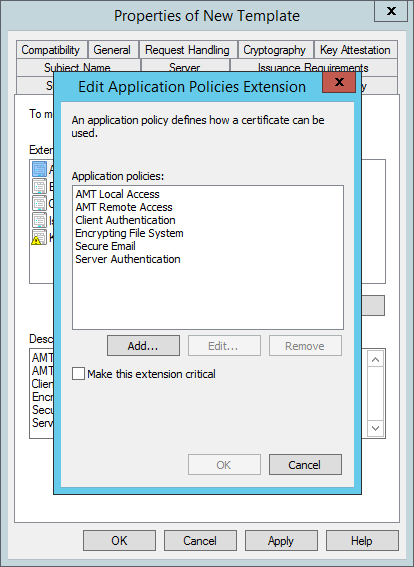
- Click OK to return to the Properties of New Template window.
- Click OK, and close the Certificate Templates console.
- In Certification Authority, right-click Certificate Templates, click New, and then click Certificate Template to Issue.
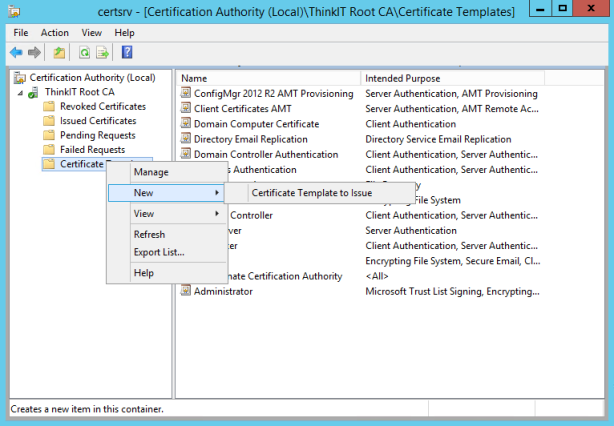
- Select the template that you just created (AMT Client Configuration Certificate) and click OK. The Enable Certificate Templates window closes and the template is added to the right pane with the other certificate templates.
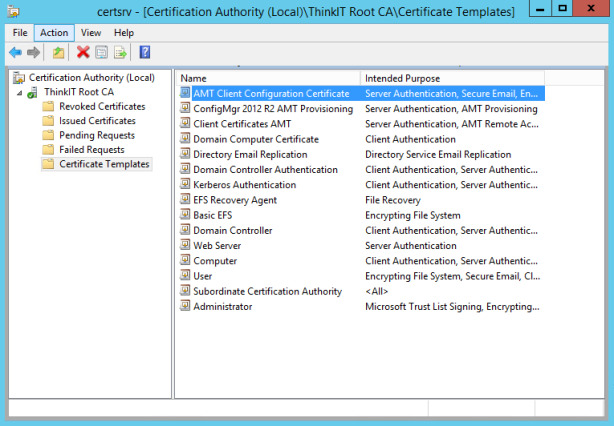
Create the AMT Provisioning Certificate Template
Second we create the Provisioning Certificate Template for Configuration Manager 2012 R2, this certificate is needed so we can configure the Out Of Band Service Point.
- On the server that has Certificate Services installed, in the Certification Authority console, right-click CertificateTemplates, and then click Manage to load the Certificate Templates console.
- In the results pane, right-click the entry that displays Web Server in the Template Display Name column, and then click Duplicate Template.
- In the Properties of New Template dialog box, on the Compatibility tab, ensure that Windows Server 2003 is selected for Certification Authority and Windows XP/Server 2003 is selected for Certificate recipient.
- In the Properties of New Template dialog box, on the General tab, enter a template name for the AMT provisioning certificate template, such as ConfigMgr 2012 R2 AMT Provisioning.
- Click the Subject Name tab, select Build from this Active Directory information, and then selectCommon name.
- Click the Extensions tab, make sure Application Policies is selected, and then click Edit.
- In the Edit Application Policies Extension dialog box, click Add.
- In the Add Application Policy dialog box, click New.
- In the New Application Policy dialog box, type AMT Provisioning in the Name field, and then type the following number for the Object identifier: 2.16.840.1.113741.1.2.3.
- Click OK, and then click OK in the Add Application Policy dialog box.
- Click OK in the Edit Application Policies Extension dialog box.
- In the Properties of New Template dialog box, you should now see the following listed as the Application Policies description: Server Authentication and AMT Provisioning.
- Click the Security tab, and remove the Enroll permission from the security groups Domain Admins andEnterprise Admins.
- Click Add, enter the name of the computer account for the out of band service point site system role, and then click OK.
- Select the Enroll permission for this group, and do NOT clear the Read permission.
- Click OK, and close the Certificate Templates console.
- In Certification Authority, right-click Certificate Templates, click New, and then click CertificateTemplate to Issue.
- In the Enable Certificate Templates dialog box, select the new template that you have just created,ConfigMgr 2012 R2 AMT Provisioning, and then click OK.
The AMT provisioning certificate from your internal CA is now ready to be installed on the band service point server. (Microsoft have this guide posted on TechNet also).
Install the AMT Provisioning Certificate
We then need to install the AMT Provisioning Certificate on our Configuration Manager server that will run the Out Of Band Service Point.
- Restart the member server that runs IIS, to ensure it can access the certificate template with the configured permission.
- Click Start, click Run, and type mmc.exe. In the empty console, click File, and then click Add/Remove Snap-in.
- In the Add or Remove Snap-ins dialog box, select Certificates from the list of Available snap-ins, and then click Add.
- In the Certificate snap-in dialog box, select Computer account, and then click Next.
- In the Select Computer dialog box, ensure Local computer: (the computer this console is running on)is selected, and then click Finish.
- In the Add or Remove Snap-ins dialog box, click OK.
- In the console, expand Certificates (Local Computer), and then click Personal.
- Right-click Certificates, click All Tasks, and then click Request New Certificate.
- On the Before You Begin page, click Next.
- If you see the Select Certificate Enrollment Policy page, click Next.
- On the Request Certificates page, select ConfigMgr 2012 R2 AMT Provisioning from the list of displayed certificates, and then click Enroll.
- On the Certificates Installation Results page, wait until the certificate is installed, and then click Finish.
- Close Certificates (Local Computer).
The AMT provisioning certificate from your internal CA is now installed and is ready to be selected in the out of band service point properties. (Microsoft have this guide posted on TechNet also).
Part 4
f you want to enable the configuration capability of the Add-on for Intel AMT, you must define a configuration profile for Intel AMT. How you create this profile depends on if you want to use RCS Integration with Intel AMT:
- If you want to use RCS Integration – The Add-on will define the packages to get the profile from the RCS and use the remote configuration method to configure Intel AMT. You must create the profile using the Intel SCS Console.
- If you do not want to use RCS Integration – The Add-on will define the packages to get the profile from an XML file and use the host-based configuration method. You must create the profile using the Intel AMT Configuration Utility.
In this posting I’m not using the RCS Integration, so we will use the host-based configuration method.
To create the profile;
- From the Intel SCS package that you downloaded (see Part 1 of this series), open the ACU_Wizard folder.
- Double-click ACUWizard.exe. The Welcome window opens.

- Click Create Settings to Configure Multiple Systems. The Profile Designer opens.

- Click and define the folder where you want to save the profile. (I’ve selected D:\Setup\SCS Profiles in my lab environment)
- Click on the green plus button and The Getting Started window opens.
- In the Profile Description section, enter a description for the profile. This field is for informational purposes only. (I’ve used ThinkIT AMT Profile in this example)
- Make sure that the Configuration / Reconfiguration option is selected and click Next.

- Select these check boxes:
- Click Next. The Active Directory Integration window opens.
- Click and select the Organizational Unit (OU) where the object will be stored in AD. During configuration, Intel SCS sends a request to the AD to create a Computer object representing the Intel AMT device. The object is added to the OU you defined in this field. I’ve selected the OU we created in Part 2 of this series; AMT Provisioned Computers

- Click Next. The Access Control List window opens. This window lets you define users and their access privileges in Intel AMT.
- Define the user/group that will be used by SCCM and Intel SCS:
- Click Add. The User/Group Details window opens.
- Select Active Directory User/Group.
- Click Browse and select the Group that we created in Part 2 of this series; SCCM 2012 R2 AMT Administrators
- In Access Type section, select Both.
- In the Realms section, select the PT Administration check box and click OK. The User/Group Details window closes and the user is added to the list of users.

- Click Next. The Transport Layer Security window opens. This window is used to define TLS settings to apply to the Intel AMT system. When TLS is enabled, the Intel AMT device authenticates itself with other applications using a server certificate.
- Make sure that Request certificate from Microsoft CA is selected and then:
- From the Certificate Authority drop-down list, select the certification authority.
- From the Server Certificate Template drop-down list, select the template that you defined for TLS inPart 3 of this series; AMT Client Configuration Certificate.

- Click Next. The System Settings window opens.
- Define the password for the default Digest admin user built into each Intel AMT device, select Use the following password for all systems, and type in the password, I’ve used vu9ESes! in my lab.

- Click Next. The Finish window opens.
- Save the profile:
- Click Finish. The profile is added to the list of profiles and saved to the location you specified in Step 4. We will use this profile when installing the Intel SCS add-on in a later part of this series.

PART 5 - In this post we will do the configuration needed in Configuration Manager before we install the Intel SCS Add-on. We will go through the following steps;
- Adding Hardware Inventory Classes
- Adding the Enrollment Point and Out of Band Service Point
- Configuring the Out of Band Management Component
- Enabling Out of Band Management Controller Discovery
- Giving Permissions for Management Controller Discovery
- Configuring the Site to Send Power on Commands for Scheduled Wake-Up Activities
As you can see there are a lot of steps involved so this will be a long post, I’ll break it up in parts so it will be easier to follow.Adding Hardware Inventory ClassesBefore installing the Add-on, you must add some hardware inventory classes to Configuration Manager that are required by some of the Add-on components. These classes are imported from files supplied with the Add-on:- sms_def_AMT.mof – Adds classes with a prefix of Intel_AMT. You must import this file if you want to install the Intel AMT component.
- sms_def_SCSDiscovery.mof – Adds a class named Intel_SCS_Discovery. You must import this file if you want install any of the other Add-on components.
These 2 files are found in the Intel SCS Add-on for Microsoft System Center Configuration Manager package mentioned in Part 1 of this series.- Open the Configuration Manager Console.
- In the left pane, select Administration > Client Settings.
- In the right pane, right-click Default Client Settings and select Properties.

- Select Hardware Inventory.

- Click Set Classes. The Hardware Inventory Classes window opens.

- Click Import.
- Navigate to the SCCMAddon folder, select the sms_def_AMT.mof file that was included with the Add-on, and click OK. The Import Summary window opens.

- Click Import and then click OK two more times to close the open Windows.
- Repeat steps 6 through 8 to import the sms_def_SCSDiscovery.mof file.
Adding the Enrollment Point and Out of Band Service Point- In the Configuration Manager console, click Administration.
- In the Administration workspace, expand Site Configuration, select Servers and Site System Roles, and then select the server that you want to use for AMT provisioning.
- On the Home tab, in the Server group, click Add Site System Roles.
- On the General page, specify the general settings for the site system, and then click Next.
- On the Proxy page, click Next.
- On the System Role Selection page, select Out of band service point and Enrollment point from the list of available roles, and then click Next.
- On the Out of band service point page, do not change the default settings for the scheduled power on commands unless you have to fine-tune these for your network infrastructure. Click Next.
- On the AMT Provisioning Certificate page, click Browse to select the AMT provisioning certificate that you created in Part 3 of this series. If you have multiple certificates to choose from and are unsure of which certificate to choose you can check this by doing the following;


- Decide whether you must clear the Enable CRL checking for the AMT provisioning certificate check box, and then click Next.
- On the Enrollment Point Settings page, review the settings. Keep the default settings unless you need to change them for your environment. Click Next.
- Complete the wizard.
This guide can also be found on TechNet.Configuring the Out of Band Management Component- In the Configuration Manager console, click Administration.
- In the Administration workspace, expand Site Configuration and then click Sites.
- On the Home tab, in the Settings group, click Configure Site Components, and then click Out of Band Management.
- Select the enrollment point that you configured in the preceding procedure.
- Specify the OU and then the universal group that you configured in Part 2 of this series. (AMT Provisioned Computers)
- Specify the AMT web server certificate that you configured in Part 3 of this series. (ConfigMgr 2012 R2 AMT Provisioning)
- Click Set to specify a strong password for the account in the Management Engine BIOS extension (MEBx) that is used for the initial authenticated access to manage AMT-based computers. (In my example vu9ESes!)
- Your Out of Band Management Components Properties page should then be similar to this;

- Click OK to close the Out of Band Management Component Properties dialog box.
Enabling Out of Band Management Controller DiscoveryConfiguration Manager has a built-in capability for discovering the status of an Intel AMT system. (This built-in capability is not the “Discovery” capabilities that are added when you install the Add-on.) The purpose of the Configuration Manager discovery is to get the status of Intel AMT on each system. The status is then shown in the Configuration Manager in the “AMT Status” column. (You can add this column to the list of devices by right-clicking the table header in Devices and selecting AMT Status, as shown in this example.) When you right-click a system, the Out of Band Management Console is only made available if the “AMT Status” of the system is “Provisioned”. This status is only updated by SCCM when the OOB Management Controller Discovery is run. This means that it is very important to make sure that this capability is configured and can run successfully.To get the status, Configuration Manager connects to the system OOB via the Intel AMT ports. To connect successfully, Configuration Manager must use credentials of an admin user account configured in Intel AMT. This means that you must make sure that you configure an admin user account in Intel AMT that Configuration Manager can use.
- Open the Configuration Manager Console.
- In the left pane, select Administration > Overview > Site Configuration > Sites.
- In the right pane, right-click the site and select Configure Site Components > Out of Band Management. The Out of Band Management Component Properties window opens.
- Click . The AMT Provisioning and Discovery Account window opens.
- In the Name field, type “admin”. (This is the name of the default Digest admin user account.)
- In the Password fields, type the password we defined in the profile in Part 4 of this series. (In my example this is vu9ESes!)
- Click OK to close the open Windows.
Giving Permissions for Management Controller DiscoverySome of the task sequences installed by the Add-on will automatically try to run the Management Controller Discovery on the systems. For this to succeed, you must give certain permissions to the domain computers account.- Open the Configuration Manager Console and select Administration > Security > Administrative Users.
- Right-click Administrative Users and select Add User or Group. The Add User or Group window opens.

- Click Browse and select the Domain Computers account.
- Click Add and select the Operations Administrator role.
- Click OK. To close the Add User or Group window.
Configuring the Site to Send Power on Commands for Scheduled Wake-Up Activities- In the Configuration Manager console, click Administration.
- In the Administration workspace, expand Site Configuration, click Sites, and select the primary site to configure.
- On the Home tab, click Properties, and then click the Wake On LAN tab.
- Select the Enable Wake On LAN for this site check box, and then select Use AMT power on commands only.

- Click OK.
Configuration Manager 2012 R2 is now configured and in the next post in this series we’ll install the Intel SCS Add-on.
- In this post we will install the Intel SCS Add-on and verify the the installation. I’ve also added some steps to fix a couple of bugs.Installing the Add-on1. Copy the IntelSCS_SCCMAddon folder to the computer where the Configuration Manager Console is running, in my lab this is the Primary Server. You can find the link for this Add-on in Part 1 of this series.2. In the SCCMAddon subfolder, double-click SCCMAddon.exe. The Welcome window opens.3. Click Next. The License Agreement window opens.4. Select I accept the terms of the license agreement and click Next. The SCCM Settings window opens.
 5. The wizard automatically detects the necessary SCCM settings. Make sure that the settings shown in the SCCM Settings window are correct and click Next to continue.6. The Select Components window opens. The necessary files for these components are located in the download package of Intel SCS 9.0. You can find the link for Intel SCS 9.0 in Part 1 of this series.
- In the Path column of the Intel Solutions Framework row click the icon under path to select the file.
- Browse to the Solutions_Framework\Framework folder of the Intel SCS 9.0 download package and select the file named HostSolutionManagerInstaller.msi.
- Click Open. The path to the file is updated in the Path column. In addition, the wizard automatically searches the download package for the required files of the remaining default components in these locations:
- Intel SCS Platform Discovery Utility – The PlatformDiscovery.exe file in the Solutions_Framework\PlatformDiscovery folder.
- Intel AMT – The ACUConfig.exe file in the Configurator folder.
If successful, the paths to the files are updated in the Path column of each row. You can hover the mouse over the Path entry to show the full path.7. For each row in the table of components verify Install is the option set in the Action column. In this series we are not integrating with RCS so make sure this option is not selected.8. Click Next. If you selected to install Intel AMT, the Intel AMT window opens.- Select the check boxes of the capabilities that you want to enable. For each capability that you select, the Add-on will create packages and task sequences in SCCM. It is recommended to enable all the capabilities.
- When the Configure check box is selected, you will need to specify the configuration profile that you created (in advance) for Intel AMT. Click Browse to select the profile XML file that you created and enter the password in the Encryption password field. (This is the profile XML that we created in Part 4 of this series).
9. Click Next. The User Account Settings window opens.By default, the packages created by the Add-on are run using the SCCM client on the host computer. If you want to use a different user, you can define the user account in this window. If you define a user account in this window, all packages created by the Add-on will be defined to run using this account. Here select the CM_AMT account we created for AMT Provisioning in Part 2 of this series. (Also note that this account must be member of the local administrator group on each client where you want to run this package.)10. Click Next. The Add-on Packages Folder window opens.During installation, the Add-on automatically creates packages for the components that you select to install. For each package, the Add-on creates a folder containing the files required by the package. For simplicity, all these folders will be located in a single parent folder that you define in this window. The parent folder must be in a location that the Configuration Manager can always access.- Click Browse. The Browse for Folder window opens.
- Browse to a location that the Configuration Manager will always be able to access and create a parent folder for the Add-on packages. Give the folder a name that will help you to recognize the purpose of this folder.
- Click OK to close the Browse for Folder window.
11. Click Next. The wizard installs the selected components. When complete, click Next. The Completed Successfully window opens.12. Click Finish to exit the wizard and then perform the Post Installation Tasks described below.Post Installation TasksThis section describes the tasks that you need to do after installing the Add-on.Refreshing the CollectionsAfter installation, the collections added by the Add-on might need to be updated in the Console.- Select Asset and Compliance > Overview > Device Collections.
- To update the members of a collection:
- Right-click the collection and select Update Membership.
- Right-click the collection again and select Refresh.
Bugfix #1There is an error in the script that is created during installation of the Add-on so browse to the path where you specified that the package would be created in step 10 above. (D:\PackageSource\Applications\Intel in my lab example)So browse to this path and edit the configure.bat file that is placed in the Intel AMT subfolder.Scroll to the bottom and here you will see that the script still have references to the Intel Demo environment where this script probably where created; “wmic /Node:2008R2SCCM2012.vprodemo.com /namespace:\\root\SMS\site_A12” I’ve changed this to the correct server name and site code of my lab. See screenshots below.Bugfix #2Based upon how you specified the path to your profile XML file you also must edit the Intel AMT Configuration Task Sequence to make sure that the path to XML file is correct. Since the profile XML actually is part of the packaged created I’ve just removed the path and reference the profile XML directly. See screenshot below.Enabling the Task SequencesBy default, the task sequences created by the Add-on are disabled. You will need to enable them before you can use them.Before you enable a task sequence you can modify the deployment target collection and schedule the re-occurrence according to your company policy. For Intel AMT, it is recommended to schedule a daily recurrence of Maintenance, Configuration and Unconfiguration, and a weekly recurrence of Discovery.As you can see from the screenshot above all Collections created by the add-on are limited on the All Systems Collection, so be careful when you enable the Task Sequences so you do not target all your systems without intention. Since this is in a lab I have control and uses the collections created by the add-on, but when I deployed at customer we created new collections to make sure no one accidently deployed to all the systems without intention.To enable a task sequence right-click it and select Enable.What is created by the Add-on?Below a series of screenshots will show what is created in Configuration Manager when you install the add-on.CollectionsTask SequencesPackagesWe have now installed the add-on and a ready to deploy our first client to verify functionality. So in the next posting we will go through the prerequisites on the client, configure a client for AMT and look at the different functionality we get with Out of Band Management.
We are now ready to deploy our first system for Out of Band Management using the Intel SCS integration, so we have support for newer versions of Intel AMT.
In my lab I have 2 HP laptops for demoing this (EliteBook 2560p and EliteBook 8440p), and before we start we need to make sure that our clients have all the pre-requisites installed;
- BIOS – it’s always recommended to run the latest version of BIOS available
- AMT Firmware – check your vendor’s site for latest firmware for AMT for your model, also recommended to always run the latest version available
- Intel Management Engine Components – all major vendors have this available on their pages for the system you’re running (You’ll need the full installation, not only the driver)
In my lab I’ve installed these prerequisites manually, but in a production environment you’ll package these and make sure the systems you want to include in OOB have these installed automatically. At my customer we upgrade/install these prerequisites during the OSD process fully automated.
- Firewall – for your Out of Band Service Point and Out of Band Management Console to be able to communicate with your AMT clients, you need to allow incoming traffic on TCP 16993 and 16995 in your clients firewall. (This is documented on TechNet; http://technet.microsoft.com/en-us/library/hh427328.aspx#BKMK_AMTOOBPorts).
So with all the pre-requisites installed, we are now ready to provisioning both our clients for Out of Band Management;
- Enable the Intel SCS Platform Discovery Task Sequence and verify that it completes on your computers (Remember that if you enable the Task Sequence with the default deployment it will target all your systems as mentioned in Part 6 of this series).

- If you now refresh your AMT Collections you will see that your member count for the different collections are increased based on what’s discovered running the previous task sequence. (If there is no change initiate a Hardware Inventory on your clients and refresh the collections again).

- We now enable the Intel AMT Discovery Task Sequence and verifies that it completes on all the computers.

- If you now refresh your AMT Collections you will see that the Intel AMT Systems: Not Configured now includes the machines where the Intel AMT Discovery Task Sequence where run. (If it’s empty initiate a Hardware Inventory on your clients and refresh the collections again).

- Finally we enable the Intel AMT Configuration Task Sequence and verifies that it completes on all the computers.

Once this is done we need Configuration Manager to discover the provisioned systems so we can use the built-in Out of Band Management Console.
- Expand the Intel AMT Systems: Configured so you can see all the members. Right click one of the computers, select Manage Out of Band and select Discover AMT Status (You can monitor this process in the amtopmgr.log file on your server).

- Right click on one of the top columns and select AMT Status and AMT Version

- You will then get 2 columns added that shows the AMT Status, Externally Provisioned and AMT Version, the version of AMT on the computer system. (If this is blank right after you’ve finished step 2 do a refresh of the computer in the console)

- You have now successfully provisioned and discovered a computer for Out of Band Management. If you right-click the computer and select Manage Out of Band you now will see that you have the option to start theOut of Band Management Console and do Power Control.

Now that we have successfully provisioned and discovered a computer for Out of Band Management we can use the Out of Band Management Console and in the next part of this series we will go through all the options we have and see how these works. This includes Web Interface, KVM, Serial Over LAN (SOL), IDE Redirection (IDER), Power Commands and Integration with Wake-On-Lan. I’ll also show you the functionality of some other 3rd party tools you can use to control computers that are provisioned with AMT.
PART 8
If you’ve followed the previous parts in this series, you’ll now have one or more clients provisioned for Out of Band Management in Configuration Manager, in this last part I will go through and show the features that this will provide you with.
PingWhen we configured the AMT Profile in Part 4, we left the option “Enable Intel AMT to respond to ping requests” enabled. This means that the machine will respond to ping request even when powered off, so how can we identify if a system is powered on or off with ping? If you look at the screen shots below you’ll see that PC001 have a TTL=128 when powered on and TTL=255 when powered off.

 We also enabled all the management interfaces when we configured the AMT Profile in Part 4;
Web UIThis will enable a Web UI on all your clients provisioned on port 16993, your reach this Web UI on https://fqdn:16993
You will then be presented with the Log On page, here you can log in with one of the users present in the SCCM 2012 R2 AMT Administrators group created in Part 2 of this series.

If you are not able to logon (will fail after 3 attempts) and you are sure that you type the correct username and password, take a look at KB908209. After reading this you’ll see that you need to add the following setting to Registry on the machine you’re trying to access the Web UI from; (Below is for 64-Bit, check KB for 32-Bit computers)
- Start Registry Editor.
- In the left pane, locate and then click the following registry subkey:
HKEY_LOCAL_MACHINE\SOFTWARE\WOW6432Node\Microsoft\Internet Explorer\Main\FeatureControl - On the Edit menu, point to New, and then click Key.
- Type FEATURE_INCLUDE_PORT_IN_SPN_KB908209, and then press ENTER.
- On the Edit menu, point to New, and then click DWORD Value.
- Type iexplore.exe, and then press ENTER.
- On the Edit menu, click Modify.
- Type 1 in the Value data box, and then click OK.
- Exit Registry Editor.
Serial Over LAN (SOL)
The SOL feature only lets you see the boot process and BIOS remotely (Text only), if you will remote control inside Windows and wants full GUI use the KVM feature described later)
To use the SOL feature you need to start the Out of Band Management Console (Right click computer in Configuration Manager Console -> Manage Out of Band -> Out of Band Management Console)

IDE-Redirect is a very helpful feature of Intel AMT. With this feature an administrator can reboot the machine on to a redirected disk or a CD ROM Drive. You can control this from the Out of Band Management Console also.
In the example in the screen shots below I use it to remote boot the machine into WinPE from a redirected ISO on my Configuration Manager server.

 If you use large ISO’s with IDER, make sure you take a look at this post to speed things up; Speeding up Intel AMT IDE-Redirection with a 2-stage boot process
Power Commands
If you right click computer in Configuration Manager Console -> Manage Out of Band -> Power Control you’ll be able to Power On, Power Off and Restart Computer. Be aware that the Power Off is a hard Power Off, but from version 9.0 of Intel AMT support for Graceful Shutdown is added.

KVM
In Part 1 I’ve posted the link to Intel Core vPro processor add-on for System Center Configuration Manager if you install this on the system that is running the Configuration Manager Console it will add the ability to start a KVM session and set an Alarm Clock for your computers. These features are added as right-click tools, see screenshot below

When you start a KVM session the first thing that will happen is that a user consent is required. (This is because we do host based configuration/provisioning of AMT, if you want to bypass this you’ll need to set up the RCS component of Intel SCS. I’ll post a series on this later). This consent consists of 6 digits that needs to be typed in before you can connect, once typed in you have full control of the remote system and have a full GUI. The session will remain active until terminated and also survives reboots, so you can reboot a remote system and go into BIOS etc.




With this this series of integrating Configuration Manager 2012 R2 and Intel SCS 9.0 comes to an end. I hope it’s been helpful and if you have any questions or comments please let me know, thank you.
Courtesy Link :
https://sccmguru.wordpress.com/2013/12/20/integrating-configuration-manager-2012-r2-with-intel-scs-9-0-part-1/#comments
https://sccmguru.wordpress.com/2013/12/21/integrating-configuration-manager-2012-r2-with-intel-scs-9-0-part-2-active-directory/
https://sccmguru.wordpress.com/2013/12/22/integrating-configuration-manager-2012-r2-with-intel-scs-9-0-part-3-certification-authority/
https://sccmguru.wordpress.com/2014/01/02/integrating-configuration-manager-2012-r2-with-intel-scs-9-0-part-4-configuration-profiles-for-intel-amt/
https://sccmguru.wordpress.com/2014/01/03/integrating-configuration-manager-2012-r2-with-intel-scs-9-0-part-5-configuring-sccm-2012-r2/
https://sccmguru.wordpress.com/2014/01/25/integrating-configuration-manager-2012-r2-with-intel-scs-9-0-part-6-installing-intel-scs-add-on/
https://sccmguru.wordpress.com/2014/01/30/integrating-configuration-manager-2012-r2-with-intel-scs-9-0-part-7-deploying-intel-amt/
https://sccmguru.wordpress.com/2014/01/31/integrating-configuration-manager-2012-r2-with-intel-scs-9-0-part-8-out-of-band-management-options/
https://sccmguru.wordpress.com/2013/12/20/integrating-configuration-manager-2012-r2-with-intel-scs-9-0-part-1/#comments




No comments:
Post a Comment