This is going to be a huge post, but hopefully someone will find it useful for future references
In my previous SCCM 2012 post, I showed how-to install SCCM, but not how to configure it for encrypted communication.
So out-of-the box SCCM traffic goes unencrypted via HTTP, which is clear text. So if you manage to get inside the LAN, fire up an arpspoof or macof (or any other MITM method) you can
read the traffic going back and fourth from the client to the site servers. So therefore I’m going to show you how to install your very own Microsoft PKI infrastructure and how you enroll the different types of Certificates that you need in order for SCCM to encrypt traffic.
Before I start, I want to show you how I designed my lab for this demo. This is in a fully virtual lab environment, much of the setup I do here is not “Best Practice” but in order to make this post readable, I wanted to keep it as short as I possibly could. I have excluded much of the setup regarding CRL, OSCP and config files (If you are unfamiliar with these terms go to this page http://technet.microsoft.com/en-us/library/cc772393%28WS.10%29.aspx )
In my lab I have
1 * SQL Server (Running the Configrmgr site SQL database)
1 * ADCS (Active Directory Certificate Services) Server running Enterprise Subordinate CA (Which we are going to install in this post ) Running Server 2008 R2 Enterprise
1 * ADCS Server running Stand-alone root CA (Is also going to be installed in this post ) Running Server 2008 R2 Enterprise
1 * ConfigrMgr server ( Which was installed in a previous post )
What we are going to start with is the Stand-alone root CA, this is a server that is not connected to the network (For security reasons, and therefore not domain joined) Since we are going to create a trusted root CA, which the sub CA is going to use to issue certificates. The reason why I setup a two-tier PKI is because this is the most common used setup.
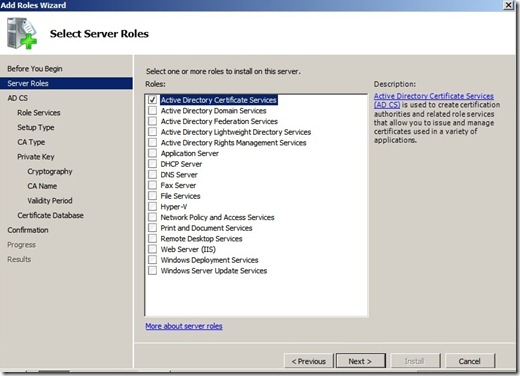
To but we do first, is install a virtual computer with server 2008 r2 ( or regular 2008 ) after the server is finished installing, you start by installing the server role ADCS
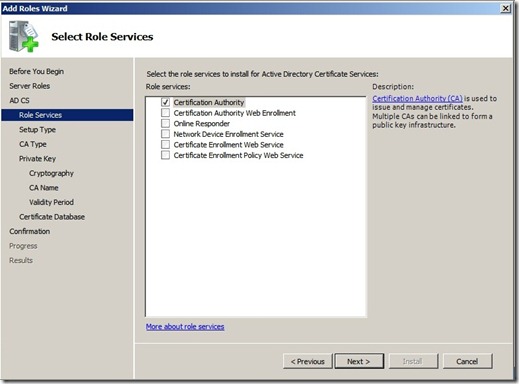
Click next and choose Certification Authority
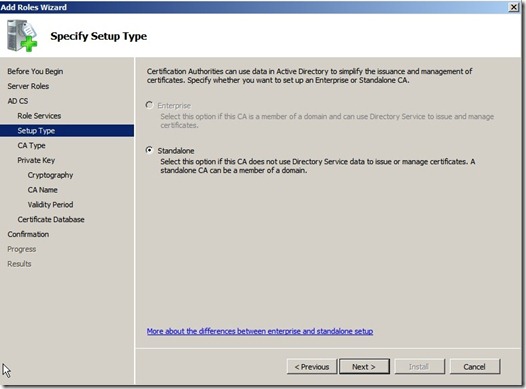
Click next and choose Standalone CA (As you can see Enterprise is unavailable since this server is not a part of a domain )
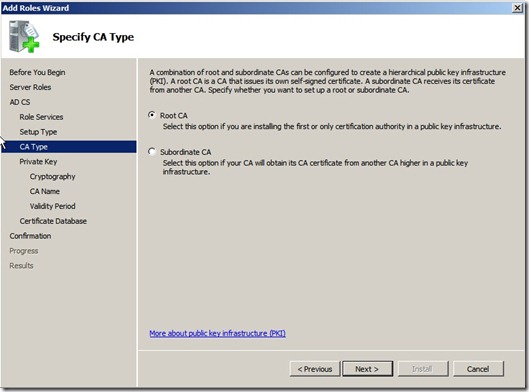
Click next and choose Root CA,
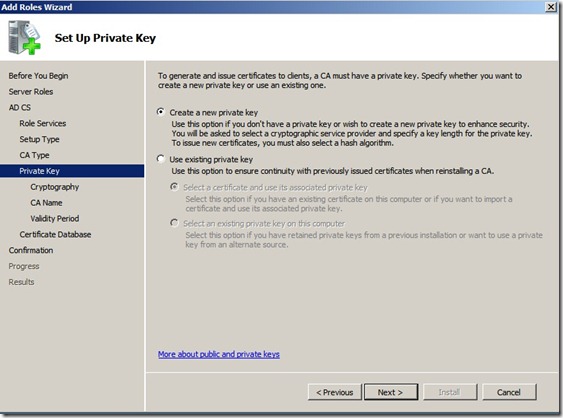
Click next and choose “Create a new private Key”
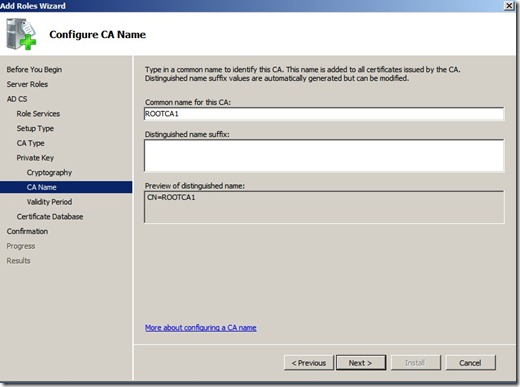
Click next, and next again ( Let it stay at the default on Cryptography ) and here by default it uses the hostname of the server (Since this was a fresh install and had the jibber is name WIN-i3ou423io I changed the name to ROOTCA1 (Which is the name that will appear on the trusted root certificate )
Click Next, next and Install.
Now after it is finished installing, go to the folder C:\windows\system32\certsrv\certenroll
There you will now have 2 files.
1 . crt file (Which is the Trusted root certificate)
1 . crl file (Which is the Certification Revocation List, which is basically a list that contains all the certification that have been revoked )
Now we have to export these files and import them on the subordinate server, so we have to install that first before we can continue. But after it is installed open a powershell prompt as a domain admin. Run the following commands.
certutil –dspublish –f filename.crt RootCA
certutil –addstore –f root filename.crt
certutil –addstore –f root ROOTCA1.crl
The first command places the root CA public certificate into the Configuration container of Active Directory. Doing so allows domain client computers to automatically trust the root CA certificate and there is no additional need to distribute that certificate in Group Policy. The second and third commands place the root CA certificate and CRL into the local store of the SUBCA. This provides SUBCA immediate trust of root CA public certificate and knowledge of the root CA CRL. SUBCA could obtain the certificate from Group Policy and the CRL from the CDP location, but publishing these two items to the local store on SUBCA is helpful to speed the configuration of SUBCA as a subordinate CA.
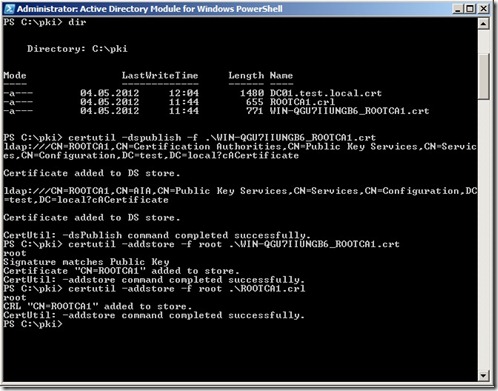
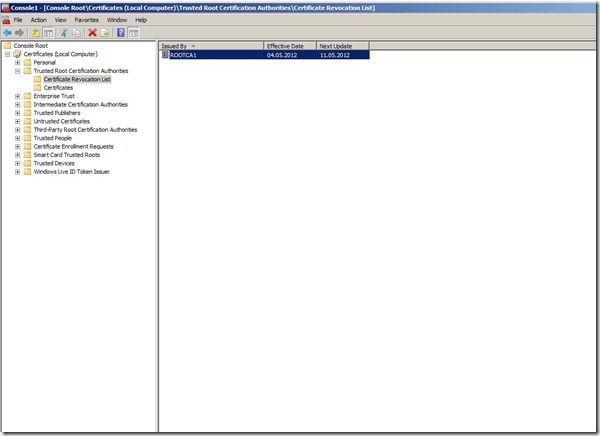
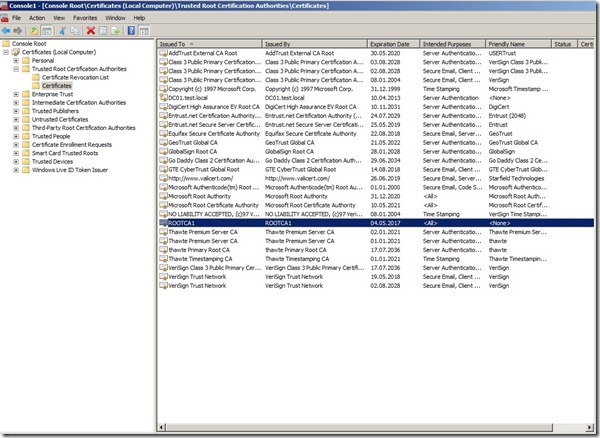
If you open the Local Certificate store on the server you can see that the Root CA and the Root CA CRL is in the local store.
Now we can continue with the Sub-ordinate install ADCS.
The Setup is basically the same,
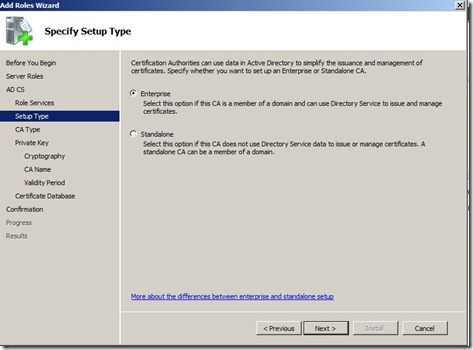
Instead we choose Enterprise CA, click next.
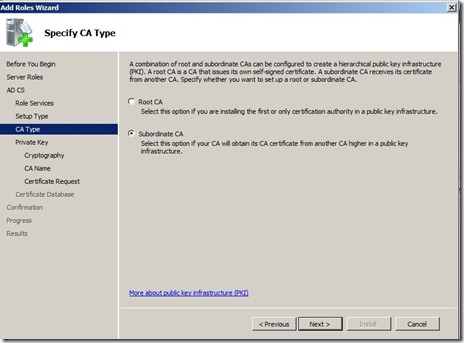
Choose Subordinate CA, click next.
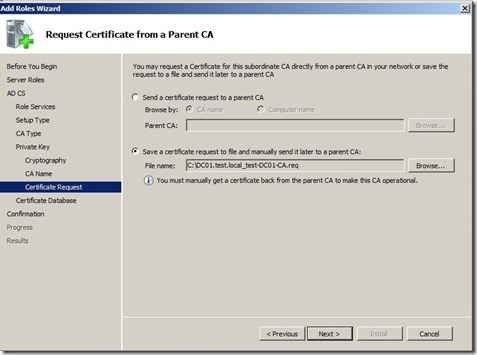
Here we choose “Save a certificate request to file” and choose a location. We need to copy this file over to the Root CA and issue a certificate in order to make the CA operational.
Click Next, and install. After you finished installing copy the file to the Root CA. Open a command prompt (ON THE ROOT CA) (PowerShell) And type the command
certreq -submit F:\APP1.corp.contoso.com_corp-App1-CA.req (remember to change the file name to match the one you have)
After you have done that, open the Certification Authority MMC, Expand and then click Pending Requests.
ROOT CA
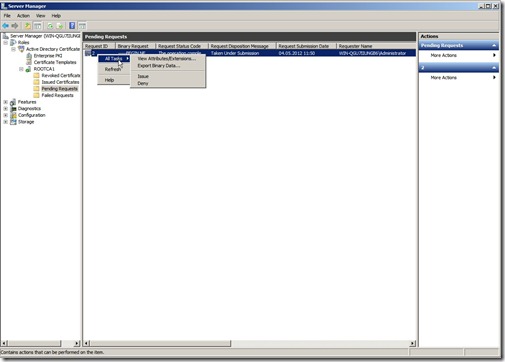 Choose the certificate and click “Issue” now we have to copy the certificate back to a removable drive.
Open a powershell promt and run the command certreq –retrieve
Click enter and choose the ROOTCA1 from the List and click OK.
ROOT CA
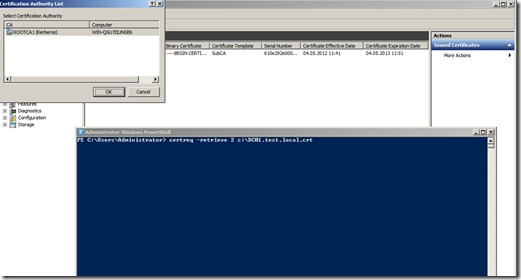 This command, will copy the certificate of the server + the root CA certificate and crl.
(If not go to the Windows\System32\certsrv and copy the other files as well)
After you have copied the files to a removable drive you can turn of the Root CA as it is no longer needed.
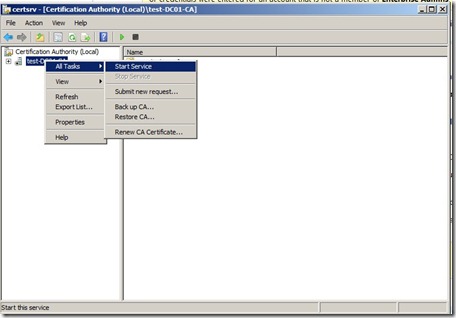
Now back to the Subordinate CA, open the Certification Authority mmc. Right click on the server click All Tasks, and then click Install CA Certificate.
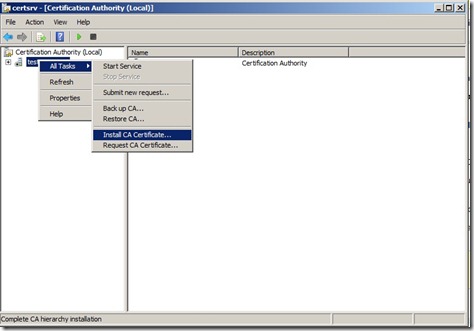 In the Select file to complete CA installation, set the file type to X.509 Certificate (*.cer; *.crt) and then navigate to the removable media and select hostname.crt. Click Open, now that we’ve imported the certiciate we can start the service.
Now what did we actually do here ?
First we setup the Root CA, which is the center of trust in this case(Tier 1). We created a Enterprise Root Certificate, we exported the Enterprise Root CA to Active Directory and to the Subordinate CA. And we installed a subordinate CA, made a certificate request, imported that to the root CA and issued the request. What it basically does is that the sub-ca says to the root “I have a request, I wish to issue certificates” and then the
root ca says to the subordinate. “I trust you, here is your certificate so now you can issue certificates on my behalf”
Since all the domain computers get the Root CA certificate in the trusted root certificate authorities, they will automatically trust all the certificates that the Subordinate CA issues to the domain.
Hopefully that made some sense 
Now we are done with the PKI setup, now we have to start with the SCCM part of the certificates.
What kind of certificates do SCCM need ?
In this demo we are going to create two templates that will automatically deployed via AD.
* ConfigMgr Client Certificate
By default, Configuration Manager looks for computer certificates in the Personal store in the Computer certificate store.
With the exception of the software update point and the Application Catalog website point, this certificate authenticates the client to site system servers that run IIS and that are configured to use HTTPS.
* ConfigMgr Web Server Certificate
This web server certificate is used to authenticate these servers to the client and to encrypt all data transferred between the client and these servers by using Secure Sockets Layer (SSL).
You can see the entire list here.
http://technet.microsoft.com/en-us/library/gg699362.aspx
Lets start with the Client Certificate
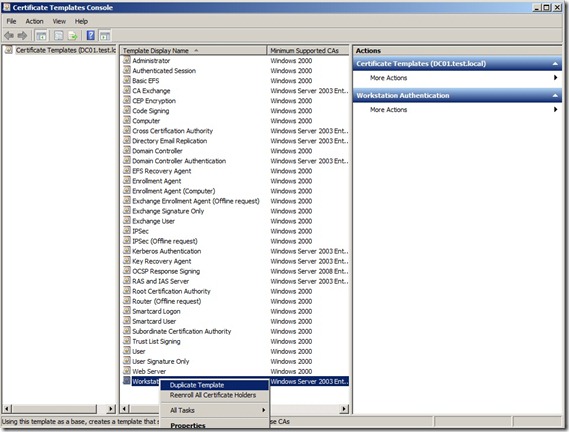
On the subordinate root CA open the Certification Authority console, right-click Certificate Templates, and then click Manage to load the Certificate Templates management console
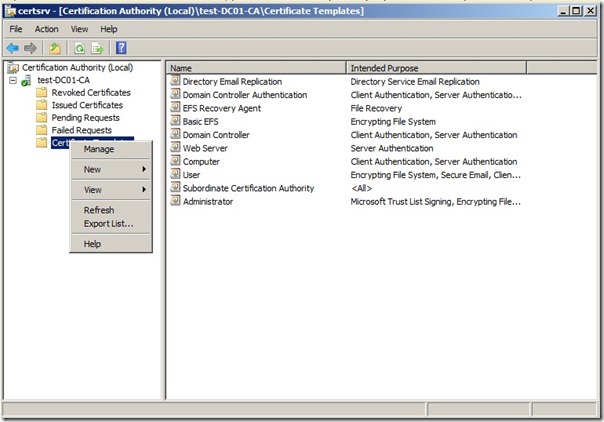 right-click the entry that displays Workstation Authentication in the column Template Display Name, and then click Duplicate Template.
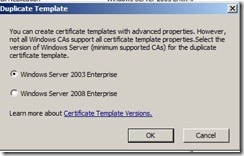
In the Duplicate Template ensure that Windows 2003 Server, Enterprise Edition is selected, and then click OK. (2008 Server is not supported by ConfigMgr 2012)
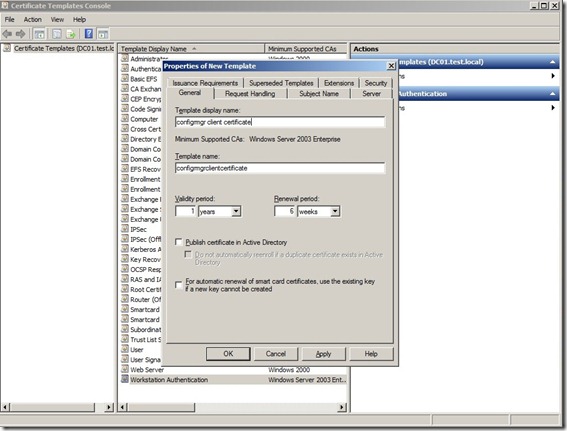
 In the Properties of New Template dialog box, on the General tab, enter a template name to generate the client certificates that will be used on Configuration Manager client computers, such as ConfigMgr Client Certificate.
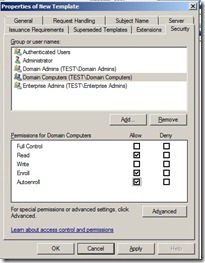
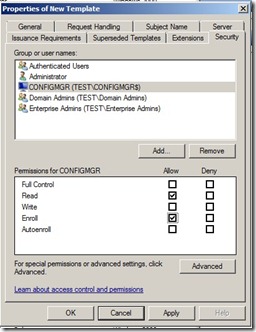
 Click the Security tab, select the Domain Computers group, and select the additional permissions of Read and Auto enroll. Do not clear Enroll (This gives domain computers the permission to get this certificate)
Click Ok, and close the Console.
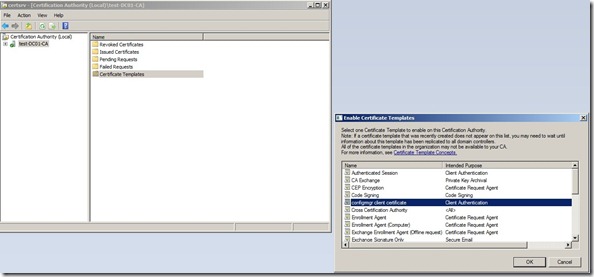
Now back to the Certification Authority console, right-click Certificate Templates, click New, and then click Certificate Template to Issue.
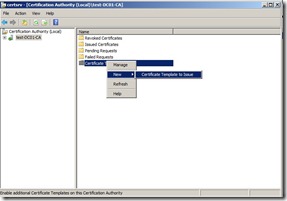 In the Enable Certificate Templates dialog box, select the new template that you have just created, ConfigMgr Client Certificate, and then click OK.
Next we need to create a group policy that allows the clients in the domain to do auto enrollment.
Open the group policy management console, and create a new group policy object.
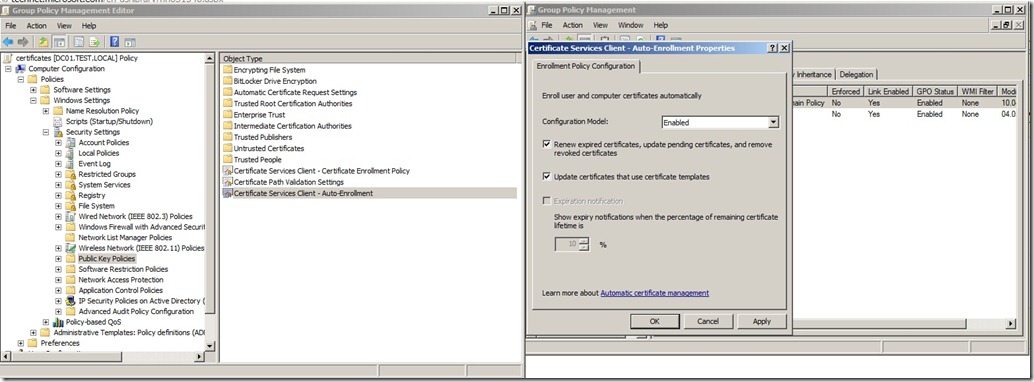
In the Group Policy Management Editor, expand Policies under Computer Configuration, and then navigate to Windows Settings / Security Settings / Public Key Policies
Right-click the object type named Certificate Services Client – Auto-enrollment, and then click Properties.
From the Configuration Model drop-down list, select Enabled, select Renew expired certificates, update pending certificates, and remove revoked certificates, select Update certificates that use certificate templates, and then click OK.
Then close the Group Policy Management Console.
If you have a client computer in the domain, reboot the computer. When the client is finished booting the client will check its policy.
1: See that it has auto enrollment enabled
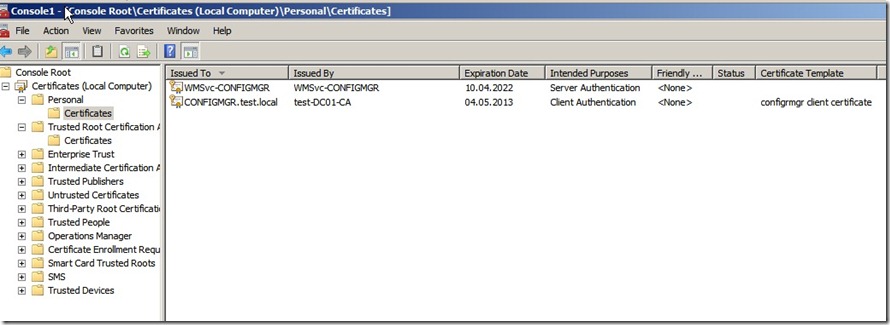
2: See what certificates it has access to (Since we added Domain computers to the ConfigMgr client certificate, it fill automatically fetch a certificate from the subordinate CA)
You can double check this by opening the local certificate store on the client computer.
Now we need to repeat this for creating a certificate template for the Configmgr server roles.
Follow the same steps as before, but there are some other changes.
Instead of the Workstation template, choose the Webserver template and choose duplicate template.
Properties of New Template dialog box, on the General tab, enter a template name to generate the web certificates that will be used on Configuration Manager site systems, such as ConfigMgr Web Server Certificate.
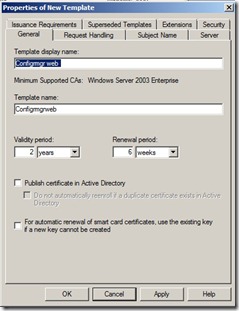 Click the Security tab, and remove the Enroll permission from the security groups Domain Admins and Enterprise Admins. Click Add, enter the name of the configmgr computer names in the text box, and then click OK. Select the Enroll permission for this group or computer account, and do not clear the Read permission. (This gives the ConfigMgr server right to enroll for this template) Then click OK.
In the Certification Authority console, right-click Certificate Templates, click New, and then click Certificate Template to Issue
In the Enable Certificate Templates dialog box, select the new template that you have just created, ConfigMgr Web Server Certificate, and then click OK.
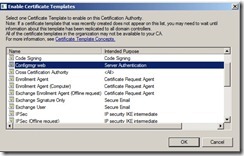 Now head over to the ConfigMgr server.
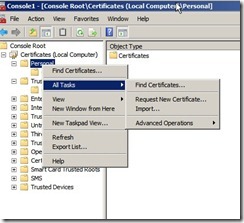
Open the local Certificate Store on the server, select computer account. Click on the personal store, Right-click Certificates, click All Tasks, and then click Request New Certificate.
On the Before You Begin page, click Next
If you see the Select Certificate Enrollment Policy page, click Next.
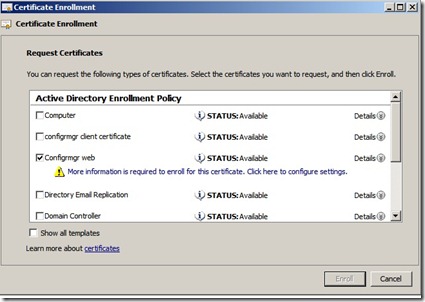
On the Request Certificates page, identify the ConfigMgr Web Server Certificate from the list of displayed certificates, and then click More information is required to enroll for this certificate. Click here to configure settings.
In the Certificate Properties dialog box, in the Subject tab, do not make any changes to the Subject name. This means that the Value box for the Subject name section remains blank. Instead, from the Alternative name section, click the Type drop-down list, and then select DNS.
In the Value box, specify the FQDN values that you will specify in the Configuration Manager site system properties, and then click OK to close the Certificate Properties dialog box.
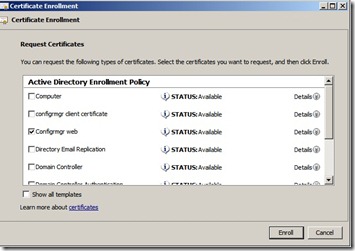
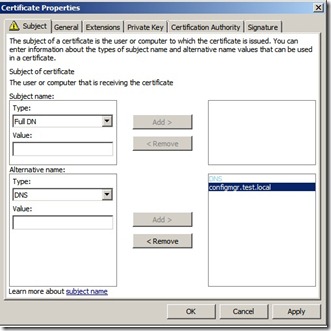 On the Request Certificates page, select ConfigMgr Web Server Certificate from the list of displayed certificates, and then click Enroll.
Now the ConfigMgr server will have a certificate available which I can use.
Open IIS Manager, Expand Sites, right-click Default Web Site, and then select Edit Bindings.
Click the https entry, and then click Edit. In the Edit Site Binding dialog box, select the certificate that you requested by using the ConfigMgr Web Server Certificates template, and then click OK. After that is done, close the console.
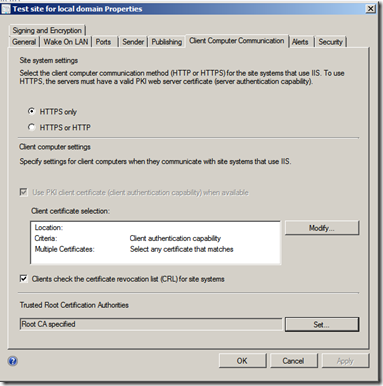
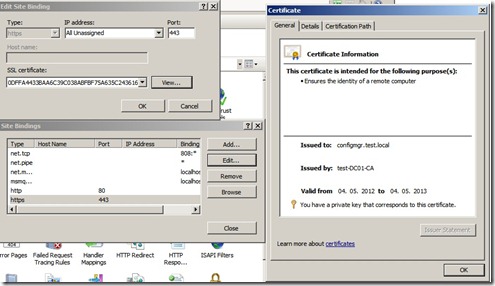 Since I’ve done this after the SCCM got installed, I have to do some configuration in the console as well. Go to Administration –> Sites –> Right click and choose properties, go to client computer communication –> Choose use HTTPS and import the Root CA crt in the bottom menu.
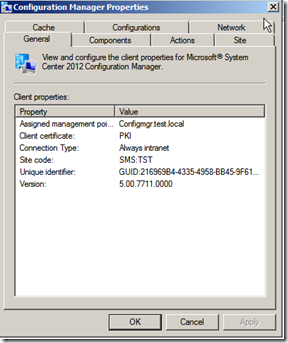
 Now im going to install the SCCM client on a new computer and see that its communicating on port 443. As you can see during the install, the setup looks for a certificate under the Personal Store on the computer, and uses that in order to communicate with the site server.
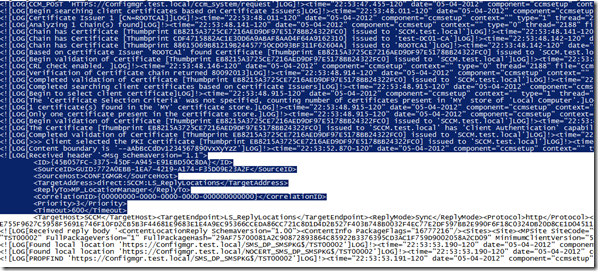 Now If I choose a Action like fetch Machine Policy, It should communicate with the Site server using https:
I can also open the Application portal, and it should be using the new certificate.
And Voila there you have it, encrypted communication between client and ConfigMgr site server (Management Point) My next blog will include the Distribution point, which uses a diffenrent type of certificate.
If you choose https mode on DP after you completed this demo you will get some error messages from your client.
Courtesy link : https://msandbu.wordpress.com/2012/05/04/sccm-2012-and-pki/
In my previous SCCM 2012 post, I showed how-to install SCCM, but not how to configure it for encrypted communication.
read the traffic going back and fourth from the client to the site servers. So therefore I’m going to show you how to install your very own Microsoft PKI infrastructure and how you enroll the different types of Certificates that you need in order for SCCM to encrypt traffic.
1 * ADCS (Active Directory Certificate Services) Server running Enterprise Subordinate CA (Which we are going to install in this post ) Running Server 2008 R2 Enterprise
1 * ADCS Server running Stand-alone root CA (Is also going to be installed in this post ) Running Server 2008 R2 Enterprise
1 * ConfigrMgr server ( Which was installed in a previous post )
Now after it is finished installing, go to the folder C:\windows\system32\certsrv\certenroll
There you will now have 2 files.
1 . crl file (Which is the Certification Revocation List, which is basically a list that contains all the certification that have been revoked )
certutil –dspublish –f filename.crt RootCAcertutil –addstore –f root filename.crtcertutil –addstore –f root ROOTCA1.crl
If you open the Local Certificate store on the server you can see that the Root CA and the Root CA CRL is in the local store.
The Setup is basically the same,
Click Next, and install. After you finished installing copy the file to the Root CA. Open a command prompt (ON THE ROOT CA) (PowerShell) And type the command
certreq -submit F:\APP1.corp.contoso.com_corp-App1-CA.req (remember to change the file name to match the one you have)
ROOT CA

Open a powershell promt and run the command certreq –retrieve
Click enter and choose the ROOTCA1 from the List and click OK.
ROOT CA

(If not go to the Windows\System32\certsrv and copy the other files as well)

First we setup the Root CA, which is the center of trust in this case(Tier 1). We created a Enterprise Root Certificate, we exported the Enterprise Root CA to Active Directory and to the Subordinate CA. And we installed a subordinate CA, made a certificate request, imported that to the root CA and issued the request. What it basically does is that the sub-ca says to the root “I have a request, I wish to issue certificates” and then the
root ca says to the subordinate. “I trust you, here is your certificate so now you can issue certificates on my behalf”
Since all the domain computers get the Root CA certificate in the trusted root certificate authorities, they will automatically trust all the certificates that the Subordinate CA issues to the domain.
Now we are done with the PKI setup, now we have to start with the SCCM part of the certificates.
What kind of certificates do SCCM need ?
By default, Configuration Manager looks for computer certificates in the Personal store in the Computer certificate store.
With the exception of the software update point and the Application Catalog website point, this certificate authenticates the client to site system servers that run IIS and that are configured to use HTTPS.
This web server certificate is used to authenticate these servers to the client and to encrypt all data transferred between the client and these servers by using Secure Sockets Layer (SSL).
http://technet.microsoft.com/en-us/library/gg699362.aspx
On the subordinate root CA open the Certification Authority console, right-click Certificate Templates, and then click Manage to load the Certificate Templates management console


1: See that it has auto enrollment enabled
2: See what certificates it has access to (Since we added Domain computers to the ConfigMgr client certificate, it fill automatically fetch a certificate from the subordinate CA)
Follow the same steps as before, but there are some other changes.
Instead of the Workstation template, choose the Webserver template and choose duplicate template.


Open IIS Manager, Expand Sites, right-click Default Web Site, and then select Edit Bindings.


I can also open the Application portal, and it should be using the new certificate.
If you choose https mode on DP after you completed this demo you will get some error messages from your client.

No comments:
Post a Comment